My Ileostomy Reversal Experience

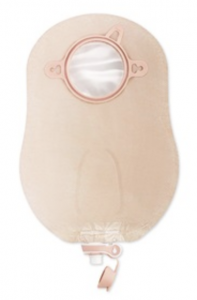
Today I’m going to cover my most requested topic: my ileostomy reversal surgery. So be prepared there’s going to be a lot of poop talk. My name is Jelena and at age 34 I was diagnosed with stage 3 rectal cancer. I had an ileostomy for over 7 months after my lower anterior resection, or LAR, surgery. The LAR surgery it’s where part of your colon and rectum are removed and the new ends they’re sewn together and you get a temporary ileostomy while that resected site heals. An ileostomy is where the end of your small intestine is run out of your abdominal wall to create a stoma and your waste exits your body through there. My ileostomy was reversed on June 4th, 2017 and this is my story on how that went how recovery was and a little bit about how things are today. I’ll also give you some tips on how to survive those first few days post-reversal.


The first step in getting ready for surgery is going in for a Flex Sig, which is short for a flexible sigmoidoscopy. They do this procedure to check and see visually how that resected site where your colon and rectum were sewn together to see how that’s healed. It’s different from a colonoscopy in that the camera – it only goes part of the way up your colon so it just goes up to the site where the colon and rectum were sewn together it doesn’t go through your entire large intestine. My procedure was done at the hospital by my surgeon and the prep for it was easy. All I had to do: I wasn’t allowed to eat after midnight, no drinking after 3:45 a.m., check-in was at 7:30 a.m., and the procedure was at 9:00 a.m. I was knocked out for it and when I woke up I was told that everything looked good and this test was passed. So this test, this procedure, was done five weeks before my ileostomy reversal surgery was scheduled.


Next up was a gastrografin enema test. Gastrografin is a water-soluble clear liquid that shows up on x-ray pictures and this test is done to make sure that there are no leaks at that resected site where your colon and rectum are sewn together. There was no prep for this procedure because they’re only looking in your large intestine and since I had the ileostomy there was no stool in my large intestine and you’re awake for this procedure. First I had to remove all my clothing from the waist down and put on a hospital gown, and while I did that, the tech prepared the gastrografin solution. You lie on your side on a table for this procedure and the first thing that the tech did was insert what was basically a deflated balloon with a tube running through it up my butt just past my sphincter muscles and then inflated that balloon so that the tube wouldn’t come out during the procedure. So that was not very comfortable. Then came the gastrografin so there’s over one liter of this fluid that gets pumped into you slowly into your large intestine. As it’s getting pumped in it gets more and more uncomfortable the more liquid’s in there and I kind of started cramping a little bit because of all that liquid being pumped in. Once the over one liter of fluid is in then you have to hold it inside of you and then the tech proceeds to take a bunch of x-ray pictures of you laying on your side, turning to the other side, on your back, with like your butt up in the air on your back in like a bridge position. It was, um, not comfortable.


When she had finished there was a bathroom connected right to that room and I pretty much just had to walk like six feet to get into that bathroom. So she said that the liquid shouldn’t come out before I get to the bathroom. Well . . . she lied. As soon as I stood up and took my first two steps I could feel some of that liquid dripping down my leg. I mean, my sphincter muscles haven’t been used in months, and even if they had been it’s really hard to hold liquid in, so I just rushed as quickly as I could to the toilet, sat down and a bunch of that fluid came out. I stayed on the toilet for about 10 minutes because I still felt like there was more in there that needed to come out, so there was another like round of the liquid coming out. But then nothing else was coming out, so I assumed all was okay so I got dressed and went home. But once I got home there was one more round of the liquid gushing out of me and then I was okay for the rest of the day. Thank goodness I passed the test and there were no leaks, so that meant I had the full go-ahead to get my reversal surgery.


This time I did a little bit of research ahead of time before going in for my surgery to learn a little bit more about what I should expect and what I should bring to the hospital with me. I only brought one pair of clothes because I knew from my previous hospital visits I wasn’t changing out that hospital gown until it was time for me to go home. I did bring a few pairsadult diaper package of underwear with me, though. I bought some adult diapers to bring with me and some diaper rash cream. I also learned that the usual criteria for letting a person go home after their reversal surgery is they first have to pass gas and then they have to pass a bowel movement. So since I knew I wanted to spend as little time as possible in the hospital, my goal was to take as few pain medications as possible, because those pain medications, they constipate you. So if I was constipated that means that would delay when my first bowel movement would happen.


My surgery was scheduled for 9 am on June 5th, 2017. My surgeon was also going to betaking my port out at the same time during the surgery because I was done with treatment and I was declared that I had no evidence of the disease so my oncologist said to go on ahead and get my port removed as well. The mood was definitely a lot different for this surgery versus my LAR surgery. I was excited to go in for this surgery because I couldn’t wait to get that ileostomy reversed. The couple of weeks leading up to this surgery, the skin
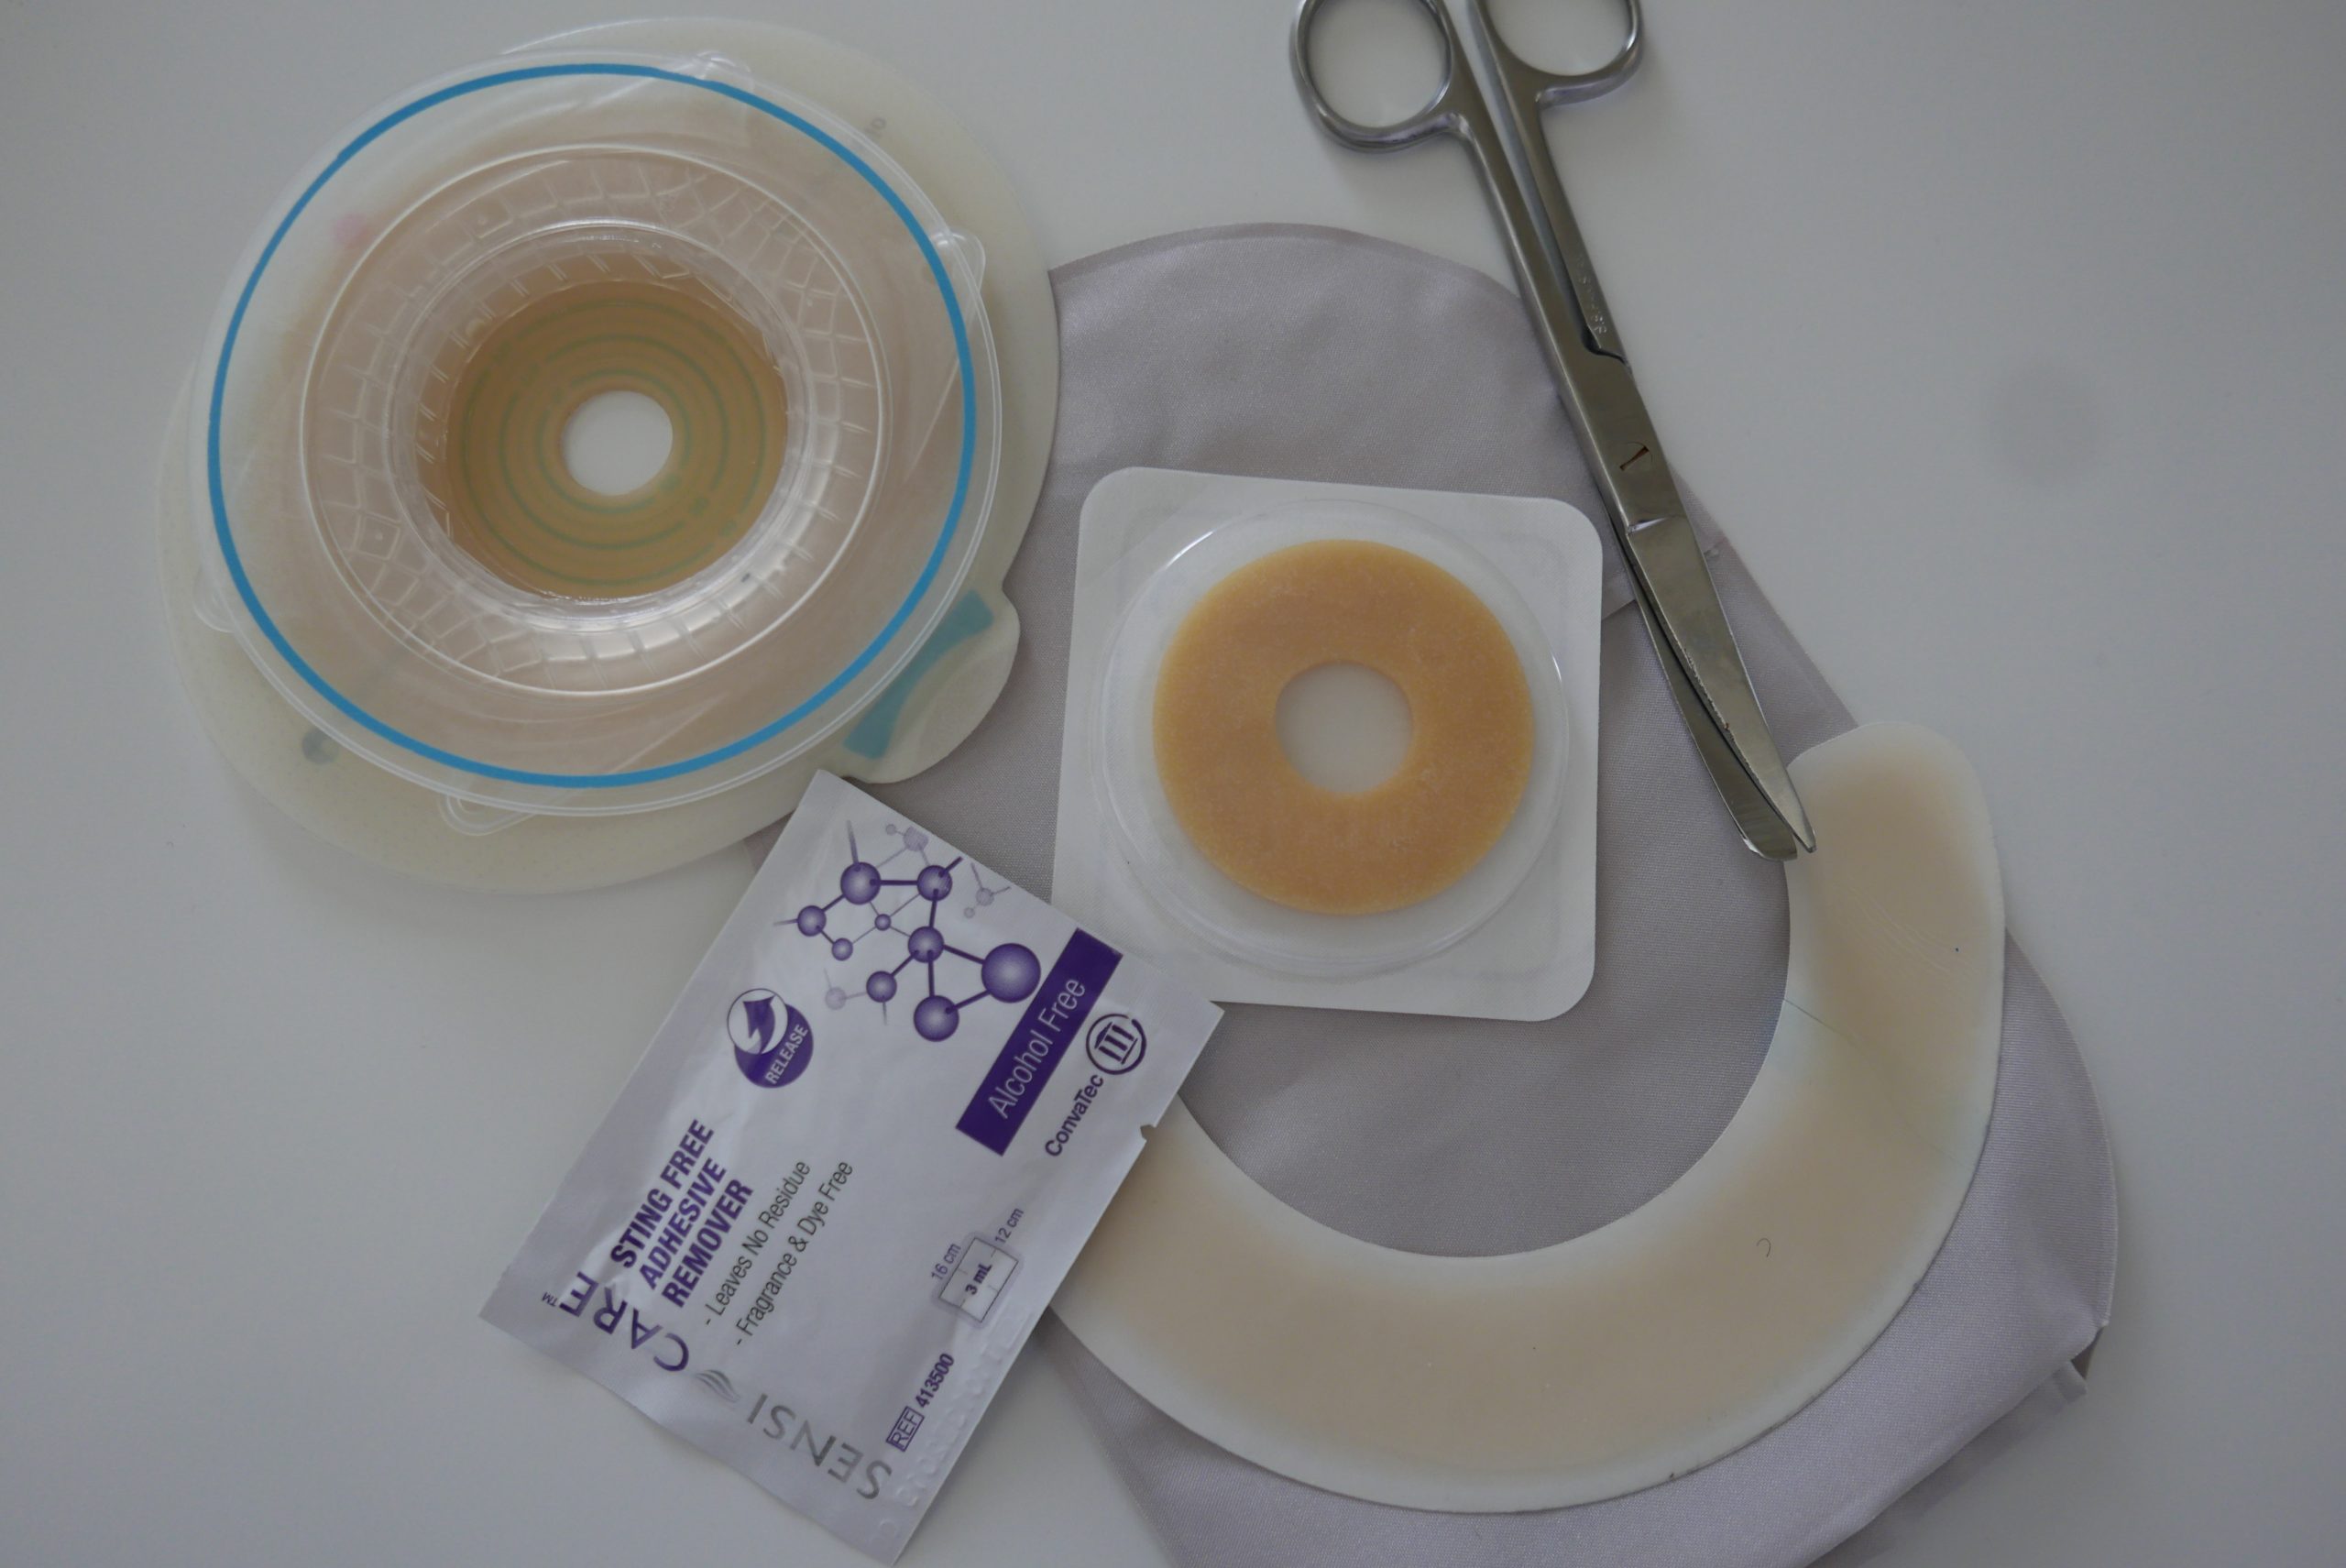
around my stoma was starting to get really red and irritated and I just didn’t really put a whole lot of effort into trying to figure out how to fix it because I knew that the ileostomy was going to be reversed. So I just got a prescription powder to put on the redness and sucked it up while I waited for that reversal surgery.


Surgery itself took about two hours and then I was taken to the post-anesthesia care unit, also known as the PACU, to wake up before I got sent to my hospital room. It took me longer to get out of the fog of anesthesia and it was making me anxious and apparently, I started freaking out because I was really disoriented, but I don’t remember any of this at all. They didn’t give John specific details as to what I was doing or saying they just told them that they were going to hold me in the PACU for a little bit longer while they made sure that I was calm before bringing me up to my room.


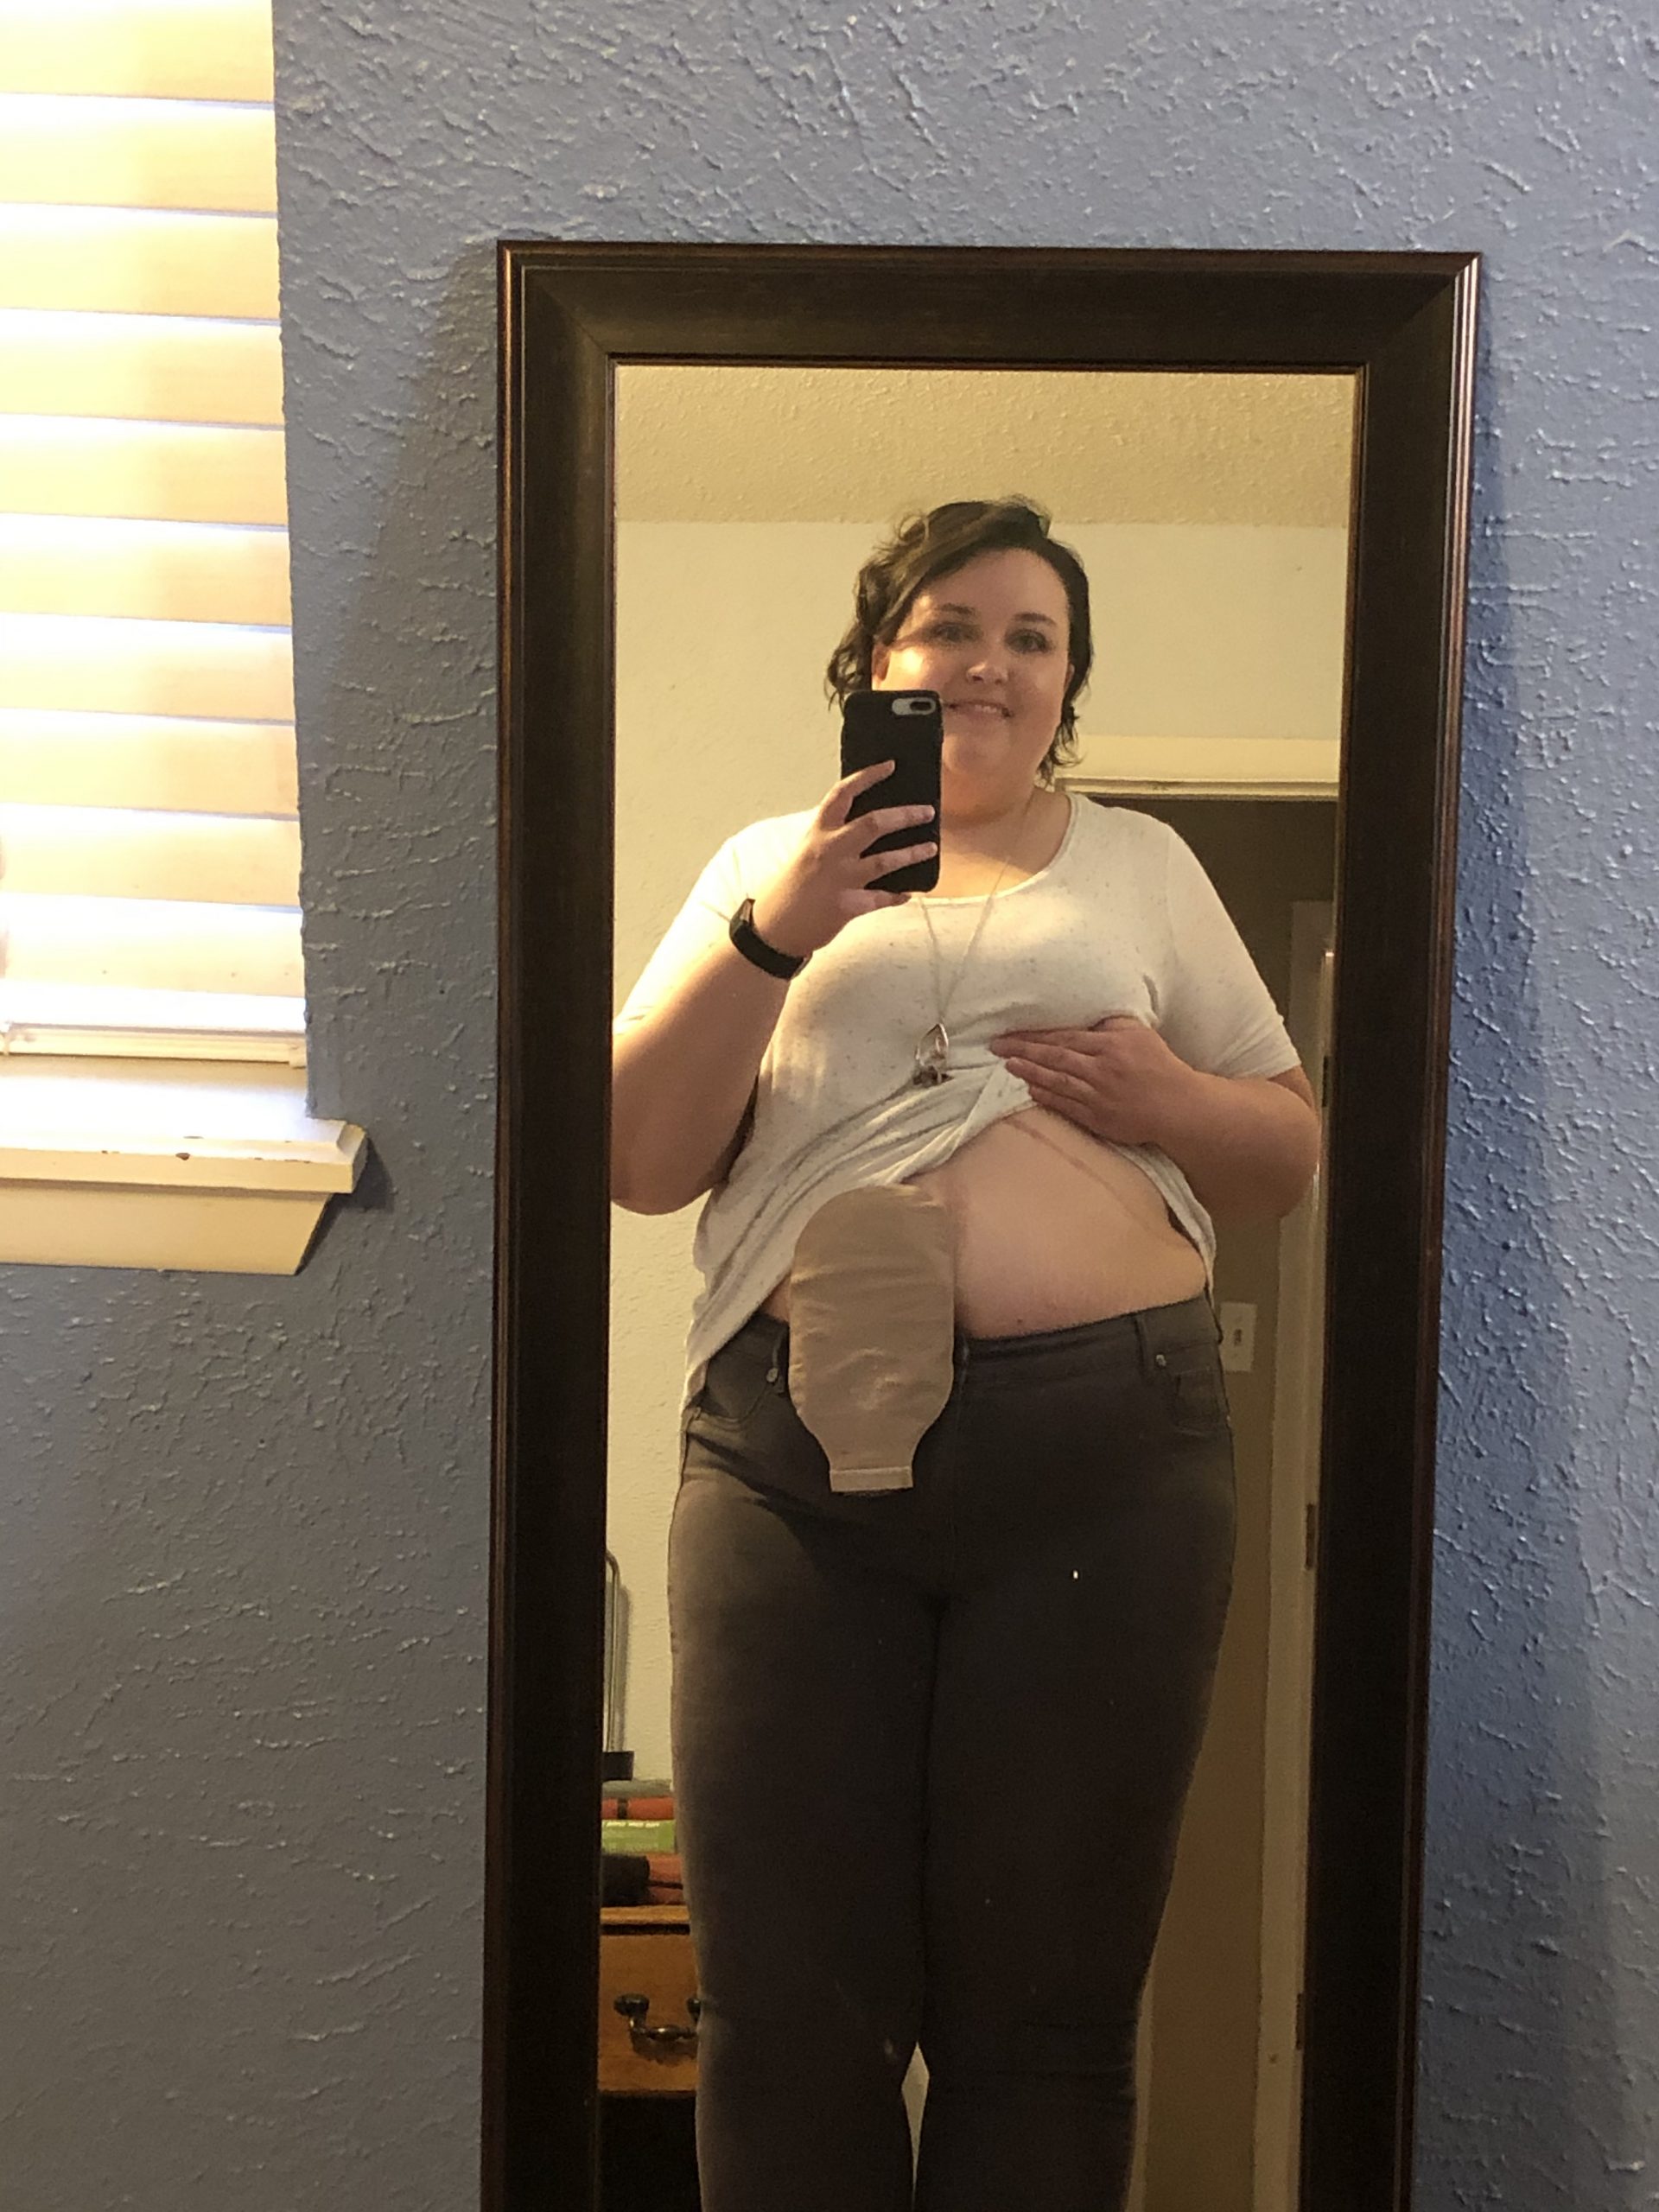
I was immediately allowed to start on the clear liquids diet once I was up, so that meant it was time to start on the jello and vegetable broth diet. I was being given Tylenol to manage my pain, but the pain was much more port scar
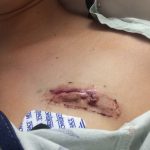
tolerable than with my LAR surgery. It was only like a two or three on the pain scale. Maybe because they just had to sew the hole in my small intestine up and basically just shove it back inside of me, and then take my port out. The hole where they put the stoma back into me, they didn’t even sew that shut they just packed it with gauze and then loosely covered it with a bandage. the port scar is pretty gnarly looking as you can see from this picture I thought it looked like I had lips on my chest and, even to this day, the scar is still pretty big and noticeable. Let me show you. Here’s what it looks like.
I was able to move around in my bed and even get up and walk on that first afternoon in the evening. I was really pleased with how much easier this surgery was and hoped that that meant that I was going to be able to get home much faster. The next morning around 5 am I passed my first fart out of my butt in months. Passing gas is that first step in showing that your bowels are waking up and working, so I was upgraded to the full liquids diet forbreakfast, and then got moved up to the soft foods diet for lunch. I spent the day just walking the halls because walking is supposed to wake your bowels up faster than just lying in bed. Plus, since I wasn’t really in a whole lot of pain, I didn’t want to just lay in bed anyway since there wasn’t anything else to do other than watch tv or walk. I also started having some mucus leak out of me and got a spot or two on the chucks pad on my bed and messed up one of my pairs of underwear. So then I switched over to wearing the adult diapers.


Right after gauze removal

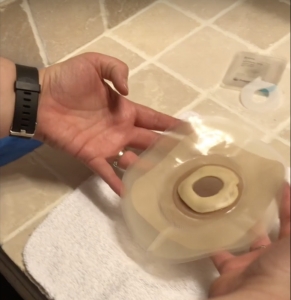
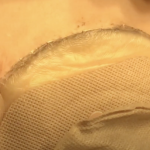
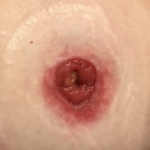
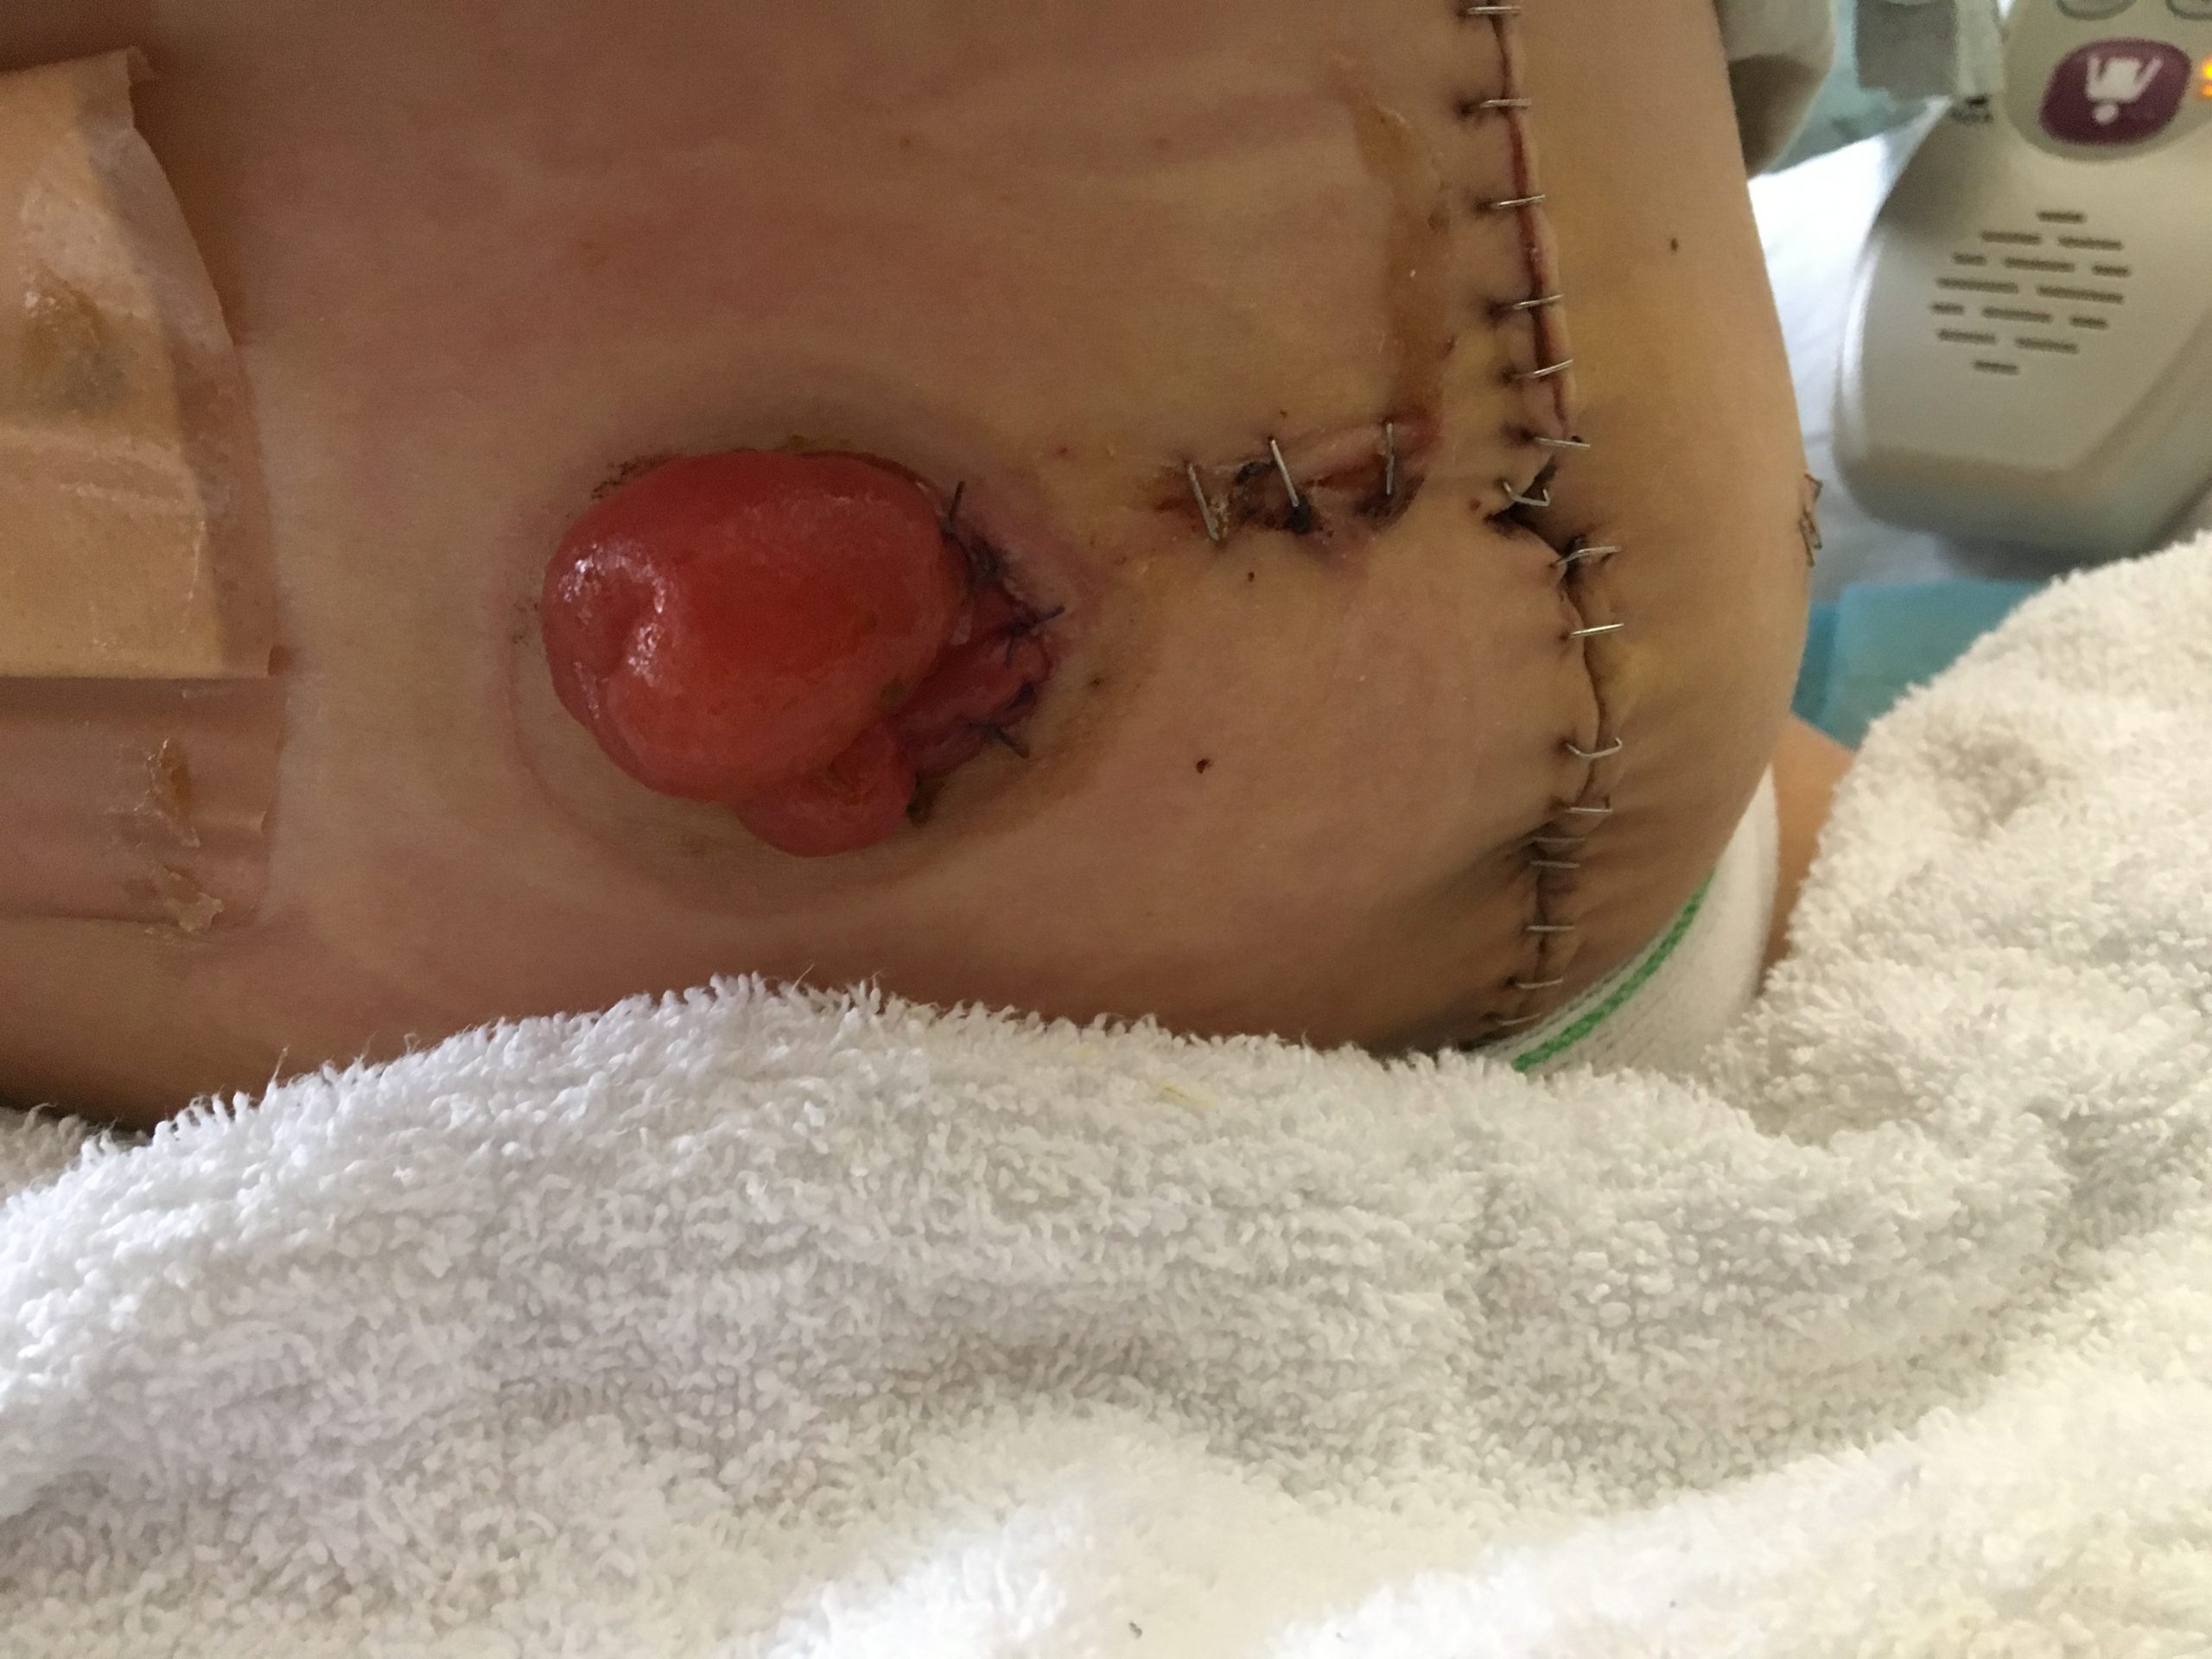
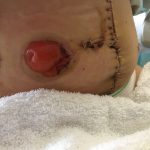
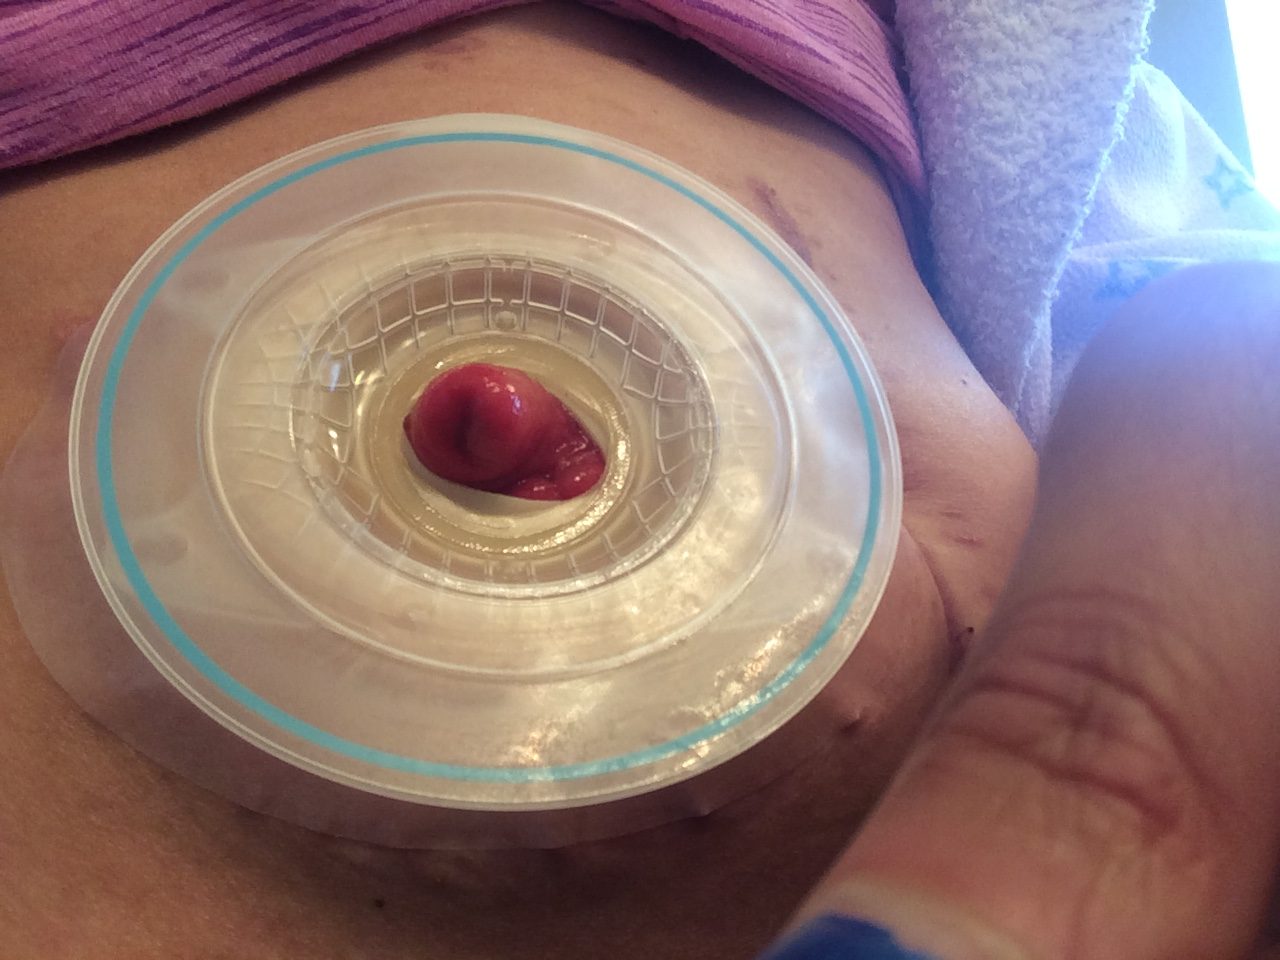
Wednesday morning I had my first bowel movement and it seemed normal. But in anticipation of the rest not being very normal coming very soon, I made sure to put some diaper rash cream on my butt to protect it. Having a bowel movement meant that I could be discharged, so I was super excited about that. To prep me for going home, first they took the gauze out of my stoma hole wound at about 7:30 a.m then by 9 a.m it was completelyclosed up already. It was really weird. Here’s the picture progression. I believe they leave it open and let it close itself up because if there’s any little traces of bacteria they want it open so that as it closes up it kind of pushes that out instead of having it sealed or having 

90 minutes after gauze removal

it sewn shut and the bacteria is trapped inside. My surgeon’s directions for eating once I got home was to just eat like normal, no diet restrictions at all. My follow-up appointment with him was scheduled for two weeks from that discharge date and he said that he wanted to give my bowels time to adjust and regulate to being normal again and didn’t want me taking any kind of medications to regulate them for at least a month.


Once I got home though, that’s when the literal poop storm began and all hell broke loose. Anytime I stood up, it felt like all the waste inside of me just rushed down immediately and I had to hurry as fast as I could to get to the bathroom to let it out. 

Once I was on the toilet though, not a whole lot came out. It felt like more needed to come out but nothing ever did. Every bowel movement was a six on the Bristol scale. If you’re unfamiliar with the Bristol scale, it’s a chart that rates your bowel movements. Let me show you the chart. A four is the normal that you want to strive for. One and two on the scale mean that you’re constipated, a six or a seven are considered diarrhea.


The first few days were spent just lying around on the couch because anytime I stood up I had that feeling that everything in me was rushing out and I would have to go to the bathroom. Even when I was lying on the couch though all day I still had almost a constant feeling that I needed to go and pass a bowel movement. I tried to hold it for as long as I could before going to the bathroom in an attempt to try and retrain my bowels so that they weren’t sending me those signals that I needed to go constantly. This wasn’t anything that a doctor told me it was just something that in my head I thought maybe would help. Instead of wearing an adult diaper I switched to wearing pads and just positioned them to the back end of my underwear to catch any leaks. I never had any like full out accidents so the pads were plenty good enough to just catch the little bit that would leak out occasionally. I didn’t count how many times I was going to the bathroom those first couple of days.


But by Saturday I was going so much I decided that I needed to track this so that I had actual data to give my doctor when I went in for my follow-up appointment rather than just saying “I’m going all the time,” I would have an exact number to tell him “I went this many times on these days.” I downloaded the My Symptoms tracker onto my phone and in that,you can keep track of your food, medications that you take, uh you can also track your bowel movements, where they fell on the Bristol scale, and also even track how urgent those movements are on a scale from zero to ten. Before I go through that tracker with you let me quickly tell you that before cancer I would usually have one bowel movement a day, it would be a four on that Bristol scale and I’d be in and out of the bathroom within five minutes.


So here’s what Saturday looked like. I had a total of nine bowel movements but I’m almost positive that I didn’t start tracking them until after lunch so I’m sure there was at least one or two before that very first one right before lunchtime. As you can see, the urgency was pretty high all afternoon and into the evening. The bathroom visits did not let up overnight on Saturday night so as you can see I didn’t really get a whole lot of sleep that night. You know how much your butt hurts after just like one or two episodes of diarrhea? Well imagine that, but going like 10+ times a day. That’s basically what I was experiencing.


My butt was getting really raw and it was burning every time that I was going even though I was putting diaper rash cream on after every visit to the bathroom. I felt like I basically lived on the toilet on Sunday with a total of 17 visits, and almost all of them were urgent but it did let up for Sunday night so that I could get some sleep. Sunday was also the first day that I saw my first fives on the Bristol scale, so we had moved from a six to a five so there was a little bit of good news there. Monday I had 12 bowel movements that were pretty much looking like peas and marbles, and my butt was so raw the diaper rash cream wasn’t helping at all anymore. I used some Dermoplast on my butt to try and cool it off a little bit but since I was going to the bathroom basically like every hour it wasn’t really working for very long.


Tuesday I started the day with two bowel movements before breakfast, another four before lunch, and my butt just couldn’t take anymore, so I turned to the internet to see if I could get any ideas of anything that I could do at home that didn’t involve medication to help me. The overall consensus was that my surgeon was crazy for telling me to just eat a normal diet and that most other people had been told to eat a low-residue diet when they came home from their ileostomy reversal surgery. So what exactly is the low-residue diet? It basically limits the amount of high fiber foods that you eat such as like whole-grain cereals, whole-grain breads, nuts, seeds, raw fruits, raw veggies with the goal of you having fewer bowel  movements and smaller bowel movements. What you want to do is look for foods that have one gram of fiber or less per serving. This diet is only meant to be followed temporarily because it’s really hard to meet all your dietary needs on it.


So what foods can you eat? White bread, white pasta, refined cereals, canned fruits andwhite pastavegetables, milk and foods made from milk like cheese and yogurt, tender meats, eggs, tofu, butter, margarine, and dressings without seeds. You want to make sure that the foods that you cook they’re soft and they’re tender. And you also want to make sure that you drink plenty of water so that you don’t get constipated. I sent my parents to the grocery store Tuesday afternoon with a list of all of the stuff on the low-residue diet so that they could buy me stuff and I could get started with this diet ASAP. It did help some because Wednesday and Thursday I only had eight trips to the bathroom on each day and I was brave enough to go outside and walk up and down my street so that I was still close by in case I did get an urgent feeling to go I was close enough to a toilet.


Then Thursday I started having poop that was a number four on the Bristol scale. Friday the urgency of my visits started going down by a lot too. There were still some that were urgent but I felt like I was finally making some progress. Saturday the number of visits went back up to 16, but they were pretty much all a number four on the Bristol scale, and I believe part of the reason I went so many times was because when I was in the bathroom just to urinate I would also just pass a little bit of stool also.


Then on Monday, I started to get nervous about having to go to my surgeon the next day for my follow-up appointment. The drive to his office was about 20 minutes and I was really nervous about making it to and from his office without pooping myself. Then Tuesday came and I surprised myself and made it to and from the office without an accident. During the appointment, my surgeon looked at the ileostomy wound site and said everything looked like it was healing just fine. Then he asked how my bathroom visits were. I told him it was really bad and painful and that I started a low-residue diet the week before to try and slow things down and to let my burning butt heal. He got mad at me for restricting my dietand said he would start me on some medications so that I could get back to eating a normal diet. He said that I could take Metamucil to bulk up my stools and I could take one Imodium daily to slow them down. But he didn’t tell me to avoid taking them at the same time.


After a few weeks of taking both of them, I found out that you’re not supposed to take any medications within two hours of taking the Metamucil because the Metamucil can reduce the efficacy of those medications. I took them both together that afternoon for the first time and I saw an immediate improvement in the urgency of my bathroom visits. I was still going a lot but by the next day I no longer had diarrhea and all of my bowel movements were fours or fives and I even had a three in there.


Wednesday night my sister and her husband flew into town to visit and by Thursday I was out on the town taking them around to all the touristy spots. I had nine bowel movements that day, but they looked normal and the urgency didn’t disrupt any of our activities that day. Then Sunday I was able to ride in the car for over an hour to take our daughter, Maelle to an overnight camp and I survived the ride back home without feeling like I needed to go urgently and without having an accident. Exactly three weeks from my surgery day I felt like I had improved enough that I no longer needed to track my bowel movements. I wasn’t completely back to my pre-cancer normal but my butt was healing, it wasn’t burning anymore, and I was confident enough to leave the house without being afraid of having an accident.


Exactly eight weeks after my reversal surgery I participated in Fight Colorectal Cancer’s Climb for a Cure and hiked for over eight hours on a mountain and only pooped once during that entire hike. That was a HUGE victory for me only having gone to the bathroom one time in eight hours. There would still be bad days but I wasn’t confined to a couch anymore and I felt like I had more control over when I actually needed to go.

Have more questions about how the reversal recovery process goes? Catch me live on YouTube on Thursday, September 17th at 12 p.m. Mountain Time. I’ll be on for about an hour answering all the questions that you have about the ileostomy reversal process and how things are going now. Make sure that you’ve clicked on the subscribe button and the notifications you’re getting all of them so you’ll be notified when I do go live and when all my future videos are posted. I hope to see a bunch of you on Thursday when I go live. Thank you for watching.

*This video was originally published on September 11, 2020

Help! What Are All the Ostomy Supplies?

Welcome to Life as a Cancer Survivor. In today’s video, I’m gonna talk all about the different ostomy accessories, supplies, the companies, and how you use all of it. Yes, there are so many different accessories and stuff that it takes up an entire video. In case you’re new here, welcome! My name is Jelena and I was diagnosed with Stage 3 Rectal Cancer in May of 2016. As part of my treatment, I had surgery to remove 12 inches of my colon/rectum and while that resected site healed I had an ileostomy for 7 months. Now on to the ostomy supplies.

First, let me talk bags. There are three major ostomy companies, Convatec, Hollister, and Coloplast. I was sent home from the hospital with supplies from Convatec. Once I got home I called Hollister and requested some samples of some of their supplies based on a recommendation from my wound care nurse. In this day and age, most people don’t like making phone calls, but the reps were super nice and very helpful, especially if you’re new to the ostomy thing and unsure of what kind of stuff that you actually need.

Then after a few weeks of trying out the Hollister bags, I decided to call Coloplast to get some samples from them. They asked me when I called what kind of bags I was currently using, how I liked them, and if there were any challenges that I was having, and then they sent me a box of samples. They quickly became my favorite bags.

First, I didn’t have to fight with the clicking anymore. The Coloplast bags I got, they have a sticker a paper that you peel off and you just stick it right to the barrier. The part where it sticks to the barrier, it lifts up a little bit so you can squeeze that or pinch it together with the bag and make sure there’s a good seal all the way around. I never once had it fail on me.

The reason number two is that the bag itself it’s made out of more of a waterproof material so when you get out of the shower it takes maybe a minute or so to dry it completely off with a hairdryer. The third reason that I loved these is that the part where you empty it, it folds completely up into the bag. So let me demonstrate here let me open this up for you so you can see how it looks when you’re going to empty the bag, so here we go. So it empties this part it opens so that your waste drains out then after you’re done you know, wipe it off then you fold it up, you’ve got the tabs on the side, and then this goes in here and it’s completely hidden no germs on your clothes.

When I was discharged from the hospital I was sent home with a catalog, very thick catalog of all the different ostomy supplies to choose from. It was so overwhelming. So let me go over what a lot of those different options are. First is the 2-piece system. It’s the system that I used and it seems to be the most common one. So all it means is that the bag and the barrier are two separate pieces so theoretically you could wear the barrier for multiple bags you can take the bag off and replace it with a fresh one.

Different companies have different ways for you to make the opening on the barrier the correct size for your stoma. There are multiple barriers where this part here it’s more of like a clay-ish material and you roll it back and pinch it down into whatever shape that you need for your stoma. Then there are cut to fit barriers where you cut the hole yourself. They already have a little bit of a hole and then you just cut it larger to whatever size your stoma is. They give you like a stiff paper kind of guide that has a bunch of circles on it and you can lay it over your stoma to figure out the size and that’ll help you guide you on how big of a circle that you need to or a hole that you need to cut on the barrier. I also got lots of scissors from all the ostomy companies to use to cut the barriers. They’re more rounded so it makes it easier to cut in a circular shape and they’re a little shorter too so you don’t have a whole lot of extra blade to deal with while you’re cutting.

Then are pre-cut barriers that you can get. After a month or so after surgery when your stoma has kind of finally settled in size, if the opening is perfectly round then the pre-cut is the way to go. Mine was never perfectly round so even if I bought ones that were pre-cut I would still have to modify it so I figured why bother getting pre-cut if I’m gonna have to cut it anyway. I would still not recommend ordering more than about a month or so at a time of the pre-cut barriers for a while, while your stoma is still making some minor changes and getting settled in.

I also mentioned in my last video in the first week with my ileostomy that I had a lot of troubles trying to click the bag onto the barrier because my muscles were so sore and weak I couldn’t flex them to givea stiff surface to push that bag down onto the barrier. My wound care nurse recommended trying an accordion barrier that Convatec carries. As you can see from this picture the part of the barrier that the bag clicks onto can be pulled up so you can get your hand and fingers under it so you can pinch the two together to get it to click easily. This made getting the bag to click onto the barrier way easier but since there was that accordion bit even though it did flatten back down some it was still pretty bulky and it was more expensive than the traditional barriers so I only used a few of them at the beginning.

Next is the one-piece system. As you can probably guess the one-piece system is where the barrier and the bag are one piece, they don’t come apart. They’re good for you if you change the bag in the barrier at the same time and you don’t ever adjust the positioning of your bag. By that I mean, the ones that click together you can rotate the bag in the position that it is in on you so you can have it like down when you’re emptying it over to the side a little or if you’re wearing a special belt you can move it completely sideways but with the one-piece whatever position you put it on that’s where it’s stuck.

Now onto the accessories. First up are powders. You can use stoma powder on the skin around your stoma to make sure that it’s perfectly dry before applying any kind of like barrier spray or wipe or even just putting the barrier on. Having dry skin before you get started is really important for your skin health and it also helps the barrier to stick much better. You apply the powder using a puff method so that kind of a cloud of the powder puffs out and gives more of an even coverage rather than having blobs all over.

Next up are barrier wipes and sprays. These are the first layer of protection that you can put down on your skin. Using a ostomy supplies - barrier wipesskin barrier helps protect your skin not only from the output but also from the adhesive from barriers. I started to develop a bit of an allergy to the adhesive, so using the skin barrier wipes would help keep my skin from getting as irritated from having that barrier down all the time. It also helps prevent the build-up of adhesive around your stoma and promotes skin health around the stoma. They come either in individually wrapped packages kind of like a moist towelette or in a spray. I used the wipe version and let’s say my stoma is up here on my chest I would start around the stoma and then I would wipe all the skin around anywhere where the barrier was going to be touching so everything underneath there I would use the wipe on.

Next up, barrier rings. These are good to help prevent leaks immediatelyHollister barrier ring around the stoma and protect the skin right around it. They’re also good to fill in uneven skin contours so that you have a flat surface to place the barrier on your body. So you can place these either directly on your skin or you can place them on your barrier. They’re pretty stiff when you first take them out of the package so to warm them up and make them softer you’ll want to just kind of like knead it in between your fingers and then you can stretch it, you can roll it, you can even use your scissors to cut it into multiple pieces. I would cut mine in two and I would put it on my skin directly. I would do the bottom half and the top half because of the uneven shape of my stoma it was just easier to do half at a time instead of the entire thing. An alternative to the barrier rings is barrier paste. It has the same purpose as the barrier rings it just comes in a paste or like a strip form which looks kind of like a piece of licorice. The paste, it comes in a tube so you just squeeze out however much you need. These can be better than using the ring if you just have small problem spots then you don’t have to use the entire ring you can just tear off a little bit of that licorice looking piece of paste or just squirt it out of the tube.

Another helpful accessory are barrier strips. These you put on the barrier,ostomy barrier strips if the edge starts peeling up a little early before you’re ready to change it you can put these strips on and they’ve got the sticker on the back so they just peel off and you put these on to prevent the peeling. You could also use these if you’re doing extra-sweaty activities to help keep the barrier from peeling off. Another useful accessory are adhesive remover wipes. Sure, you could just peel the barrier off but the adhesive remover wipes make it a much gentler process and makes sure that you’re not peeling off skin with the barrier and you’re being more gentle on the skin. Since you’re adhesive remover wipegonna be wearing barriers on the exact same place for extended periods of time you want to be as gentle as you can to that skin around where the barriers are gonna be. So using the adhesive remover wipes you just have to peel the barrier back a little bit from your skin and then use the wipe right where the skin is meeting and just keep peeling it down until you get the whole thing off. Then after you’ve removed the barrier make sure that you wash all of that adhesive remover really well off of your skin before you get started with placing a new barrier on.

Next up is lubricating deodorant. This usually comes in a bottle and youlubricating deodorant put it in your bag either when you’re putting a new bag on or you can put it into your bag after every time that you empty it. This two-in-one liquid neutralizes the odors that are in your bag and it also makes it slippery so that your waste slides out of the bag much more easily. I used it for a while at the beginning, but then I realized that I had an ileostomy and everything was coming out pretty liquidy anyway so I didn’t really need the lubricating part of it and my husband John said that he never really noticed the smell of my bag when I was just sitting around so I didn’t really need the deodorizing part either so I stopped using it.

An accessory that wasn’t an option for me is a stoma cap. This is only an option for those that have a colostomy and either irrigate or have stoma capvery predictable output. The cap is really just a small closed-end bag that you wear on your barrier and it’s just the size of the barrier basically. It’s only meant to be worn for short periods of time when a full-size bag could get in the way like when playing sports, when swimming, or during intimate moments. The bag doesn’t really hold any waste at all so it’s mostly just there to keep your stoma from touching things because the stoma is always wet.

And last but not least are support belts. There are different kinds that offer varying types of support for your bag. The simplest kind is basically just a fancy piece of elastic that’s got hooks on either side. Most of yourbarriers will have some kind of little thing like this where you can click the end of the elastic in on both sides and it basically just kind of holds it up against your body a little bit better than just it being on its own. There are also support belts that have a large round hole, you can see pictured here they put pressure on your barrier to help keep it snug against your body and ostomy support beltprotect you from getting a hernia. I got one of them but once I switched to the Coloplast bags the hole on the belt ended up being too small and it would bunch up the barrier so it’d be really uncomfortable and I was afraid that it was gonna cause my system to prematurely leak so I didn’t really use it a whole lot. There are even fancier support belts that you can get that will hide the entire system that you could even stick Stealth Belt for ostomiesyour bag into. I didn’t invest in any of those because I knew my ileostomy was only gonna be temporary. But I had a friend who knew that she was gonna have hers for a long time and she invested in a Stealth Belt. It was expensive but she said it was worth every penny.

Another alternative that you can use is a pregnancy belly band. I actually had one leftover from my pregnancy that I hadn’t gotten rid of so I used that as a cheap alternative to the Stealth Belt. It wasn’t the same of course, but it did hold the bag up close against me, kept it from bouncing around, and hid it really well. That is a lot of stuff!

Now just because I talked about all these things doesn’t mean that you need to use all of them. It’s definitely a trial and error kind of system because everybody’s body’s, skins, stomas are all different so you just kind of have to experiment with what works best for you. Once you’ve met your annual insurance out-of-pocket, which if you’re a fellow cancer patient isn’t gonna take you long to do, you can try a lot of these different products for little to no cost thanks to your insurance. Take advantage of stocking up on some supplies when you can so that you’re prepared in case there are shipping delays or you go through a string of a lot of bag leaks and you go through a lot of bags and barriers having to change them a lot because of those leaks.

One other really good resource that I want to mention to you guys if you want even more information on how exactly to use some of these supplies check out the Vegan Ostomate, I’ll have the link for his channel up here, Eric is the owner. He has a lot of excellent videos that go into much more detail because he currently has an ostomy so he can actually demonstrate on himself how a lot of these things work and how you can use them so check his channel out for further resources on ostomy supplies and living with one.

In my next video, I will talk more about all the ups and downs of having an ileostomy and some tips on staying active and traveling with one. If you’re not subscribed to my channel yet make sure you’ve clicked on the subscribe button and hit the bell so you’re notified when all of my future videos are posted. Please give me some love and click on that like button down there too and thank you so much for watching.

*This video was originally published on July 3, 2020

Changing a Colostomy and an Ileostomy Bag

As a continuation of last week’s video of what the different ostomies are, this week I’m gonna share with you what it’s like to do a full appliance change on a colostomy bag. If you don’t remember that you must be new here, so welcome to Life as a Cancer Survivor. This channel is here to give you all the ups and downs, ins and outs of what life is like once you hear those words “you have cancer.” My name is Jelena, and in May of 2016 I was diagnosed with Stage 3 Rectal Cancer. For all of my newbies, make sure that you’ve hit the subscribe button either right below the video or the link is in the description right below and you’ll never miss any of my new videos.

Last week I interviewed Shiray, a Stage 4 Rectal Cancer survivor that’s also an advocate for the organization Fight Colorectal Cancer. I wanted to talk to her so that she could educate us on what a colostomy is since she currently has one. She very graciously offered to record her bag change after our interview. Then once she sent all the videos to me, she had a lot of good information in there and I didn’t want to really cut any of it out but it takes a while to do the change and to explain everything so I thought just making it it’s own video would be best so that you can see it all together and not have any of the bits cut out.

She starts off with how she lays out all the supplies before she gets started with anything. Then she takes the bag off and then of course she shows how that bag, the new bag attaches to where the stoma is. So without further ado, here’s her video.

(Shiray) So here’s what I use when I change my bag. I have these blue Equate gloves, you can get them at Walmart. I have adhesive remover wipes by Brava. I have Ivory soap to clean the area this one’s really good because it doesn’t have any moisturizers in it. I use Head & Shoulders because the zinc in it helps protect my skin so I kind of lather it up at the end and then put it on my stoma on the skin around my stoma and just let it sit for a little while. And then rinse it off and I’m ready to put the new back on. These are called barrier strips and I place these on the outside of the flange kind of like that. I use two of them so I can go all the way around.

This is a barrier ring and this goes on the inside of the flange right here to help create a better seal. This is the flange I use the Hollisterostomy suppliestwo-piece drainable system and this one has a convex on the back which pushes my stoma up. This is my pouch, it’s open right now and it just connects to the flange with the rings. And then I bought a bunch of these white cloths from Walmart that you can bleach and they come in handy. So before I get in the shower I always put my piece together so that it’s ready to go as soon as I get out so I put one of these cloths down just to keep my counter sanitary and I get these rings, or these barrier strips. I take the protective back off of it and I lay it really carefully, these are really easy to mess up, they fold up on each other and they stay folded. So I get those two ready.

Next thing I do is get my flange. There is a backing on it that peel off and I keep because this makes a really good fan for when I get out of the shower. I take off these paper strips on the side and again this is all done really carefully just so you don’t ruin the appliance. I place it down and then I want to place the sticky side up on these strips. If it folds under it’s okay as long as it doesn’t fold together and so I just repeat it on the other side making sure that the ends of this meet I use these barrier strips because I ended upostomy barrier with barrier strips and ringbeing allergic to the adhesive that’s on this brown material and so these strips help protect my skin. So I leave that there, I get my moldable ring this is the same kind of material that these strips are made out of. Take off all the extra papers and I kind of pull it out a little bit just to make the opening wide enough to fit over the flange. And I place this around the edge. And it’s moldable so you can move it around and kind of play with it to get it flat then I just lay that to the side. And it’s ready to put on as soon as I get out of the shower.

So this is what my bag looks like at the end of the week,the start of changing an ostomy bag you see some discoloration here but that’s just the fuzz from your shirts, I have dog hair on mine because I have three dogs. This is where I start using the gloves I just put two on just to make sure that my hands are protected from what’s inside the bag. I also use little trash bags that come with the pouches, and I take my adhesive remover I like to use two just so I can get all the glue off. It’s just a moistened towelette and I just start working along the edges. You want to make sure not to pull it too hard because you’ll rip some skin off, some hair, anything that’s on your belly and it can cause irritation that will keep your bag from sticking the next time. I’m just running along the edge I don’t want to go too fast. And I just keep going around until it’s completely off. So I just take my bag once it’s completely off and I put it inside of the trash bag and I leave this bag so I can get all of the extra stuff from all of this change so all of these papers will go in everything will go in. So I’ll get in the shower and I’ll show you what it looks like afterwards.

Okay, I’m out of the shower and so once I got out just so no stool gets out on me after I’mcleaned I protect myself with one of these rags and I also have a small piece of toilet paper rolled up underneath that’s covering my stoma directly and this just protects the rag. I bleach these but I still like to have just a little extra layer of protection. So with the tissue, you do have to peel some pieces off you can take the edge of your rag and rub them right off. So I do have some irritation here on the bottom of my

end colostomy stoma with irritation
Stoma with irritation

stoma so I’ll make sure to change my bag in a day or two just to make sure that that’s not getting worse usually it heals on its own without any issues but just to make sure. 

So now I want to make sure that my skin is completely dry so I get that plastic piece from my flange and I just kind of fan it off. So while I’m drying, this is my incision from when I got my colostomy they had to open me up after trying to do it laparoscopically, and then you can see that I just have one hole so that’s the end colostomy. If there was a second entrance here below that would be called a loop colostomy.

So I just make sure I’m good and dry make sure I’m clean keep tissue close by so ifsomething starts coming out you can wipe it off if it gets on your skin you have to start the whole process over again so now I take my flange that all my stuff on it and I sort of line this up in the mirror. Once I know for sure it’s good and I can set it down I just kind of work my way from the inside out.

Make sure it’s set up, I’m watching it in the mirror so I make sure that no stool is coming out but I just try to push this for a little bit just make sure it gets a really good seal. A little wrinkle here and there is not a big deal you just want to make sure that the piece that’s connected to your skin which in my case is this isn’t wrinkled or folded up on each other because that’s where you’ll have your failures. Then I take my bag, the pouch, it’s got a little grommet. And so I start at the bottom just so I can see it, and I just push it on.

And it’s still open so any air that’s coming out right now will come out of the bottom but I just go around and make sure that it’s sealed all the way around. And then I flip that up, secure it with the velcro piece, double-check it, make sure it can’t come loose, and I’ve got a new bag.

Now that you’ve watched her change her bag and understand a little bit more of what the different supplies are and the terms for them, I’m going to show you how my bag change differed a little bit from hers. So as you can see from this picture my stoma opening is not perfectly round. I would get barriers that have an opening that I would need to cut so I would use these special scissors that the ostomy companies sent. They’re not sharp at the end so I would cut this so that it would be just the right opening for my stoma. After the skin around it was perfectly clean and dry I would use a skin barrier wipe so they come in these little like packages so I would use this and I would wipe it all around where the stoma was to kind of put a barrier between my skin and the adhesive from this barrier. Then I would use a moldable ring that I would place directly on my skin and try to follow the edges of the stoma. But it was hard because of the shape of it. Then I would place the barrier on, watching closely in the mirror to make sure I placed it in the right position based on how it was cut. I really struggled with getting the bag to click after my surgery using the bags like Shiray has.

After surgery my abdomen was so sore from everything that had just happened so pushing down trying to get that bag click, it was just misery and I struggled so hard, tears were shed trying to get them into place, struggle after struggle. Then I discovered the system which I used all the way up until my reversal which was a sticker one much more comfy for me.

So the barrier itself, it just has this big landing pad and the bag itself you peel off this and the whole ring part here is sticky and you just stick it on there. I never once had a leak where the two stick together so it worked phenomenal for me. And there you go now you’ve learned a little bit more about the appliances that you use if you have an ostomy and what a bag change looks like.

If you happen to have missed last week’s video on what the three major types of ostomies are I’ve got the video right here you can click on that to watch it or the link is in the description below. Next week it’s surgery time so stay tuned for that. Thank you for watching and I’ll see you next week.

*This video was originally published on February 5, 2020

Week 1 with an Ileostomy: Eating, Emptying, and More

Welcome to Life as a Cancer Survivor. Jelena here, and today I’m gonna talk to you about what it’s like during that first week having an ileostomy. I had mine for seven and a half months while my bowels recovered from having a Lower Anterior Resection, which is where
they took out 12 inches of my colon/rectum and also 17 lymph nodes. I
had that surgery in October of 2016 which was five months after I was
diagnosed with Stage 3 Rectal Cancer or for those of you in Canada, Australia, or the UK, it’s Stage 3 Bowel Cancer. I have an exciting announcement to make at the end of the video so make sure that you stay tuned.

First, let me briefly describe what an ileostomy is for those of you that might be unfamiliar. It’s where they take the end of your small intestine and pull it out of your abdominal wall. We’ll say this is your small intestine, so they cut a slit in it, and then your waste will come out of your slit out of the slit and you wear a bag over your abdomen to catch that waste. So it comes out of there instead of continuing through your digestive system and coming out of your butt. If you need a more in-depth explanation, I did a video on what the ileostomy, the colostomy, and urostomies are, so click up here, I’ve got that link so you can familiarize yourself a little bit more with those. If you click on that, make sure that you come back over here and watch this video when you’re all done.

Now that you understand a little bit better what ileostomy is I’ll beginmy story with when I woke up in the hospital with the bag on. So when I woke up and I looked and I saw the bag on my stomach it really started sinking in that that was gonna be a part of me for the next few months. The bag that had been placed on me was clear on the outside so you could see the output that was coming out and also the stoma. Mine it was still pretty swollen and red so it kinda looked like a big cherry to me. I’d heard from others that some people will name their stoma to kind of make it seem a little less scary, kind of gives it a little bit of a lighter side that you can laugh at, and also when it starts having a mind of its own and acting up you’ve got a name that you can call it. So since I thought it looked like a huge cherry I decided to name mine Cherries Jubilee or Juby for short. Let me know in the poll up here if you had or have a stoma, did you name it? And if you’re feeling brave go on in the comments below and let us know what you did name it.

Once I started getting some output I asked the nurse what I should do as it started filling up. So she said to use the call button on my remote and either the nurse or the CNA which is the Certified Nursing Assistant, would come down and they would empty it for me because they were keeping track of the output so they would actually empty it into a plastic
container that had measurements on it so that they could note how much output I had. For the first couple of days, the output was just liquid and I was really glad that I did not have to deal with it ’cause it waspretty gross. The day came that I was gonna be discharged from the hospital and I had to do a bag change before I left. I was pretty nervous about doing it. I wasn’t sure how I was gonna react to seeing the stoma all by itself without the bag on it. I wasn’t even exactly sure how the small intestine was coming out of me, so I didn’t know if I was even gonna be able to look at it and figure out what exactly was going on without being completely grossed out, but I was about to find out shortly.

Once the wound care nurse came up to my room to help me with my bag change, she kind of settled my fears a little bit by showing me some
tips like taking a washcloth and tucking it in like a bib but in your underwear so that any output that may leak out you’ve got that washcloth there handy to wipe up any spills. She scheduled her visitwith me for about two hours after breakfast in hopes that my stoma would be pretty quiet and there wouldn’t be a whole lot of output when we were doing the change. She ended up pretty much doing most of the bag change herself as I kind of assisted a little and just kind of watched, tried to take notes in my head but it was pretty overwhelming. She reassured me though that I would have a home health nurse that would come visit me for two weeks and that nurse would help me at home with the changes, so if I didn’t remember everything, that nurse at my house would be able to help me remember those and help me get kind of a rhythm down. Then she gave me some supplies to take home with me to keep me held over for a few weeks while I requested samples from the three major ostomy supply companies Convatec, Hollister, and Coloplast.
You can’t really ask for samples ahead of time because you don’t know what the size of your stoma is gonna be, and the size of your stoma is gonna determine what size barrier you’re gonna need which this is the part that sticks on to you so your stoma sticks out the hole. You can cut them, but some are larger than others and then depending on what size of the barrier you get the bags that fit onto it only fit on certain sized barriers so you can’t even order half of it ahead of time because you got to know what size the stoma is. And even once you do order stuff, don’t order a ton initially because your stoma is still gonna change sizes for at least that first month that you’re at home.

Once I got home I was really nervous about eating. The nurses at the hospital had really emphasized that I needed to chew VERY thoroughly all of the food that I was eating once I got home and that I needed to avoid any high-fiber foods for at least six weeks after surgery because those foods take a lot more work to digest and my digestive system had already been traumatized enough from surgery it didn’t need to be
overworked by trying to digest those foods as well. So, more specifically those high-fiber foods that I was supposed to avoid eating were: whole-wheat breads, brown rice, raw fruits and vegetables, and dried fruit. 

I was also given a list of foods that I was supposed to avoid for the first six weeks after surgery to help avoid or decrease the chance of me getting an intestinal blockage. Those foods are:

  • vegetable and fruit skins
  • apples, dried fruit, grapes, coconut, and pineapple
  • celery, corn, cucumber, green peppers, peas, and bean sprouts
  • salad greens, cabbage, coleslaw, and spinach
  • nuts
  • casings on sausage and tough, fibrous meats like steaks

I passed these lists on to my parents because they were gonna be making meals for us for the first bit after I got home from surgery. So the first meal that they prepared for us for that dinner was a creamy potato soup, with the potatoes peeled. It took me forever to eat because I chewed so thoroughly I probably spent a minute on each bite before I swallowed it. Luckily I guess I wasn’t eating a whole lot so even though I was taking me forever to eat each bite I still finished around the same time as everybody else because they were eating a little bit more than I was.

Once I got home I had to figure out how I was gonna empty my ostomy bag. At the hospital, they just emptied it into a plastic measuring container while I was still sitting at the hospital bed. At home, I would be
emptying it while I was on the toilet. So there are a couple of different methods that you can choose from for emptying your bag:

Forward Method – you sit on the toilet like you normally would and empty your bag.


The Backward Method – is where you sit on the toilet facing the tank and empty.


The Kneeling Method – is when you kneel on the floor either in front or to the side of the toilet and empty.


You can also put a few squares of toilet paper on top of the water in the bowl to help try and prevent some splashage while you’re emptying the bag. Then after you’ve emptied the bag I would take a little toilet paper and I would wipe the outside and the inside of the end a little bit so that when I folded it up there wasn’t any waste that was squishing out of it then I would fold it up and be on my way.

I experimented with using my old peri bottle, which was a squirt bottle that you get after you’ve given birth to kind of hose yourself off after you’ve used the bathroom. So I had that squirty bottle and I would try
rinsing out the bag after emptying it but the water would feel really cold if you didn’t fill it up with warm water (right away) right before you went. And then it’s just swirling around poop all over and it was really hard to get it completely clean and within like five minutes it’s dirty again. So it wasn’t really worth it, and then I also read that it can loosen up some of the adhesive and cause your barrier to break down faster so that was kind of the final straw for me and I decided trying to rinse out the bag was not worth it.

I preferred the forward method because I would always pee when I emptied my bag and it was just easier to empty it in the position that I was already in on the toilet. I was told to never let the waste get more than about halfway up in your ostomy bag before you empty it, I believe for two reasons. One is because you don’t want that waste getting backed up so high that it’s resting on your stoma. Especially with the ileostomy because the waste coming out of your ileostomy is more acidic than regular stool so it could cause burns, especially around where the barrier is surrounding your stoma and it could break that down much quicker when there’s stool just resting on it. Also, when it gets more than half-full that bag gets pretty heavy, and even if it’s not peeling off, having that stress is gonna cause the adhesive on the barrier to break down faster.

glass of waterI tried to drink a lot of water while I had my ileostomy because your large intestine is what is absorbing most of the liquid for your body, and since that wasn’t in use and it was coming out of the small intestine I needed to drink more water to make sure that I didn’t get dehydrated. So since I was drinking more water I was peeing a lot more which gave me a lot of opportunities to empty that bag.

Two days after I got home from the hospital I had my first visit from the home health nurse and did my first bag change at home. Getting the bag off was a piece of cake. Getting it back on was a different story. My tummy was still really sore and my muscles were a wreck from surgery. When you’re trying to click the bag onto the barrier you need some kind of resistance on the barrier side to allow that click to happen, but my
muscles were shot and I couldn’t flex my muscles at all to give any kind of resistance. I kept trying and trying and trying to get it to click but I couldn’t get it to click. In between attempts, poop was coming out so I had to keep cleaning it up. After like five minutes of struggling I still hadn’t got it on so the nurse decided to try and do it. The nurse tried to get that bag to click on too and she even struggled. She worked up a sweat trying to get it on but finally, she got it on. It was a disaster. I was really frustrated once the visit was over and really fearful for how I was ever gonna change my bag on my own.

The next visit wasn’t a whole lot better. We tried connecting the barrier and the bag together first before putting it on me, but my stoma wasn’t perfectly round so it’s really hard to get it perfectly lined up. So we got it on but it wasn’t perfect, so a little bit of my skin was showing and the part that was showing ended up getting burned by the output.

The first week with an ileostomy was a struggle. I even knew goinginto surgery that I was gonna get one and it was still hard for me. Beyond getting marked for the stoma and just seeing a basic demonstration on a dummy of how to put a bag on, I didn’t really know what I was in store for. Changing that bag was SO hard. I was so sore too, that all I could wear were sweat pants, really loose-fitting elastic waist banded pants, and flowy shirts.

One more thing that I want to share with you all is that I’m launching website, Life as a Cancer Survivor! Over there I will have the subtitles to all of my YouTube videos so that you can go back and reference them in print. I don’t have all of them up quite yet but they should be finished within the next few weeks. I’ll also have a list of my favorite resources and then I’ll also have a timeline of my diagnosis and treatment for you to look at. If there’s anything else that you would like to hear from me
or see on the website, just let me know. Drop me a line in the comments and I’ll look into getting that added.

There is plenty more that I want to share with you about what it’s like living with an ileostomy and I couldn’t fit it all in this video, so make sure that you’re subscribed and that you’ve clicked on the bell so you’re notified when all of my future videos are posted. My channel is growing and it’s thanks to the love that each of you are giving to this channel.
Thank you so much for watching and I’ll see you again soon.

*This video was originally published on June 19, 2020

What is an Ostomy? | Explaining an Ileostomy, Colostomy, and Urostomy

I’ve been talking a lot about ostomies, more specifically my own ileostomy lately, but what in the world are they? Well, it’s time for that video where I explain to you what those ostomies are. If you don’t remember me talking about that you must be new here so welcome to Life as a Cancer Survivor. My name is Jelena and in May of 2016, I was diagnosed with Stage 3 Rectal Cancer. This channel, I created, to give people insight as to what life is like once you hear those words, “you have cancer.” Make sure that if you aren’t subscribed to click the subscribe button right below the video here or in the description below I’ve got the link as well so that you’ll never miss any of my latest videos.

The digestive system from the appendix to the anusFirst up let me show you what a picture of the digestive system looks like so here’s this I’ll come back to it here in a moment but this graphic it is from this latest brochure, “Your Screening Guide to Colorectal Cancer” put out by the organization Fight Colorectal Cancer. So let me get back to this graphic so here’s a close up once again this part here this is your large intestine also known as your colon. At the end of the colon that part is called the rectum. At the other end your appendix sticks down there and this squiggly part is your small intestine there’s a lot more of it this is just the last little bit of it this last section of the small intestine it is called the ileum and remember that because I will talk about the ileum again here just in a moment.

Now time to talk about ileostomies. This is the kind of ostomy that I had and it’s the most common type that rectal cancer patients receive if they have surgery as part of their treatment plan. It is named an ileostomy after the ileum which is that last section of the small intestine that I just mentioned that connects to your large intestine or to your colon. ileostomy stomaThere are two different types of ileostomies a loop and a terminal. I had a loop ileostomy which I will use my hand and this hose to demonstrate. My hand will be my abdomen to this is your small intestine. So they cut a slit in your abdomen wall and they pull up a section of your small intestine and cut a slit in it so you see there’s a slit there and they peel that back a little bit or roll it back so it’s actually the inside of your small intestine that you see sticking out. And they sew it into place and this part sticking out is called your stoma.

It’s still connected to the rest of your digestive system so a little bit of waste can still come out you still produce mucus and your large intestine that you will occasionally pass but it’s not a daily occurrence. There are no nerve endings in the stoma so it doesn’t hurt when you touch it but there also are no nerve endings there so you can’t control your bowel movements at all it’s just whenever the food is passing through it comes out.

new ileostomy and a stapled stomach

So you’ve seen what it looks like this crude model of what one looks like but let me show you a few pictures of what mine looked like. I warn you this first one may be a little gross because it shows the stoma it’s got stitches and staples so I will let you know when that picture is gone or if you don’t want to watch any of them I’ll let you know when we’re moving on to the next thing so just close your eyes but listen. So here’s the picture the first time that I saw my stoma in the hospital for my first bag change. You can see the little stitches around where the intestine attaches to my abdomen wall and then they had to make the huge incision to take everything out and stapled it shut.ileostomy stoma and scars on abdomen

This next picture is a couple of weeks later after I got the staples out my stomach is not swollen from the surgery but you can still see some of the stitches around the stoma and it’s kind of shrank down a little bit, but still um still a decent size.

ostomy bag inflated from gas


Since everything is coming out your stoma there that includes gas so that’s stoma does fart and you eat something that gives you a lot of gas at night you might wake up with a balloon sticking off of your tummy like this.

ostomy stoma with a barrier This is what my stoma looked like with the barrier on it which I will show you a better picture of what the barriers looked like in a moment but this is how mine looked with a barrier. As a souvenir, I saved one set of bags or the bag and barrier. So the barrier is the part that sticks on to you I used a two-piece system so there’s the barrier and the bag. So this is what stuck to me.

I used the Coloplast brand and I would have to cut the exact size of my stoma on the back here using some special scissors that I got and then this would stick to me. Of course, it’s down on the abdomen not up here on my chest but I also used a convex barrier which I’mColoplast ostomy bagnot sure if you can see it very well here but it sticks out a little, it pushes down on your stomach to make the stoma push out a little bit more to make sure none of the waste leaks. So with this one, it actually, here’s the bag and here’s what the bag looks like. So this bag you just peel a sticker off and stick it onto here and there’s your system this folds up and you’ve got the velcro to fold it up so this is what my system looked like on me.

The only difference between the terminal and the loop ileostomy the loop they’ve got the slit cut like I had mentioned the terminal ileostomy, they cut it completely so you’ve got two halves. So there’s just the one end sticking out of your abdomen and then they roll the sides down and sew it in the same way as the other one. So you still have this other bit of your small intestine hanging out in there they’ll sew it to your abdomen wall just so it doesn’t like drift away or anything. This kind can still be reversed but it’s a little more difficult so typically if doctors know that they want to be able to reverse the ileostomy at some point in the future they’ll give you a loop one instead of the terminal one.

Since I personally didn’t have a colostomy, I asked my Instagram friends if any of them that had a colostomy would be interested in talking about their’s with me. Shiray volunteered right away and was more than willing to get on Skype and talk with me and share with you all about what her colostomy is like. She even volunteered to have her mother record a bag change so that we could witness that as well. She was diagnosed at the age of 28 with Stage 3 Rectal Cancer in August of 2016 and after treatment, she was considered NED or having no evidence of disease. However, this past January in 2019 a scan indicated that the cancer had returned and she was considered stage four. After an exhausting year of surgeries and treatment, she currently has no evidence of disease again, yay!! This is my interview with Shiray, and she has a colostomy right now.

(Jelena) So can you start out by giving us a little background info just about your cancer story?

(Shiray) Sure, um, so I was originally diagnosed in August of 2016 with stage 3 Rectal Cancer. Um, last year we found out that I was actually restaged to Stage 4 I had some lung mets and liver mets, and so we’ve been spending the last year dealing with that. I got my colostomy bag in between the two stages/chapters.

(Jelena) So then you initially got a loop colostomy right?

(Shiray) I did.

(Jelena) So can you explain to those of us that are unsure about what exactly that is what exactly it is and why that was the right choice for you at the time?

(Shiray) Yeah, so I had kind of an interesting situation. When I first met with my surgeon he told me that I had two options, I had a loop colostomy that I could do or an end colostomy. So my GI and my surgeon were both on the same page that they wanted to try the loop first because it will be easier to reconnect in the future.

(Jelena) Okay.

(Shiray) They were looking forward they really thought that I would only have the bag for like six months, like just enough time to heal, and then I could be reconnected. Well, what ended up happening is during my surgery it started out laparoscopically, and he set me up with a loop colostomy. And so what that is is that they take your colon and they make a slice through it and they bring both ends of that slice up to the surface. And so you end up having like a figure eight or like two holes.

(Jelena) Okay.

(Shiray) And so one end of the intestine comes from your small intestine up to the stoma and then from the stoma down to your rectum is the second portion of it. So what that would mean is that most of my stool would come out of the stoma and go into the bag but since I had that other opening there was a chance that stool could go through that other opening and I would still have regular bowel movements. I was nervous about that because of the pain that I had, but they both agreed so I thought we’ll try it.

And so, during the surgery, while he was finishing up, he was actually leaving the room and the nurse said you need to come back. The loop colostomy kept like falling in through the skin so it wouldn’t stay up on top like it’s supposed to. So he made the decision at that point to open me up and change it to an end colostomy.

(Jelena) Okay.

(Shiray) I never actually lived with the loop but just for a little while. And then an end colostomy is just from your small intestine up to the stoma it’s just one hole the other
section I still have in my body it’s stitched to my abdominal wall. So they can still reconnect me but this is normally used for people who have a permanent colostomy because that other section is pulled out and removed so I still have it in in me.

(Jelena) Okay so that’s what the end colostomy is and that’s what you ultimately ended up with after your surgery.

(Shiray) Yes. People think I’m crazy when I say this, but this is the most convenient thing in the world. I don’t have to run the bathrooms, I don’t have to constantly know where a bathroom is located, I just do what I need to do and we move on.

(Jelena) Yeah. Can you show us what kind of appliances do you use to contain your waste?woman with raised shirt showing her colostomy bag

(Shiray) Yes, I use a two-piece system from Hollister. It’s a drainable pouch. Okay, so I use this it’s called a flange and you can see it’s got a little bit of a convex there and so what it does is it pushes my stoma out a little further so that the stool actually comes out where it’s supposed to. And then I connect my pouch to it with this little like grommet type thing. They go together and then this is a drainable pouch too so I don’t have to change the whole system I can either take just the bag off and throw it away and put a new one on, I can drain it, or I can change everything.

(Jelena) Okay, so how often do you typically drain it, change the bag, change the whole thing?

(Shiray) So on a normal day, I drain it probably three times. For the most part, I have pretty um oh what’s the word my chemo brain just kicked in,

(Jelena) Like predictable?

(Shiray) Predictable! Thank you. I have pretty predictable output. Typically I will have
a bowel movement like sometime around like 30 minutes after I eat. So I know like I’ve
got usually about an hour afterward I can go and change it and then move on with my day so typically about three times a day.

(Jelena) Okay so you empty it three times a day how often do you change the bag part?

(Shiray) So the bag itself I change it about midweek so I can keep the flange on for a week. It stays on pretty well unless I’ve got like a lot of liquid output that would break down this section I keep it on for a while. The bag though I don’t like the smell after two to three days I changed the bag every two to three days.

(Jelena) Okay, and the bag just clips right off right?

(Shiray) It just pops right off and they come together with this little like grommet and so you can just pull it with one of these tabs. And it just disconnects and I can pop a new one on.

(Jelena) All right. So you mentioned it’s usually like a half-hour after you eat is usually when the output starts and then is it like with a regular human that goes to the bathroom on the toilet like it just comes and then you’re done and it’s quiet for hours until you eat again?

(Shiray) I wouldn’t say that it’s quiet at all. But it is normal in like the output is the same texture as like, a normal bowel movement would be. So since it’s a colostomy I believe ileostomies are more liquid,

(Jelena) Yes,

(Shiray) A colostomy, is just a normal stool that comes out and so it really depends on what I eat and some stuff that you’d have to worry about when you don’t have a colostomy bag. It is really loud though and so that’s the thing that I think I underestimated. I think that I believed that I could control that at some point you know you can hold in farts and gas you can’t do that with a colostomy it comes out when it wants to it makes whatever noise it wants to and you just have to get used to it.

(Jelena) Yes. So you have no feeling when it’s coming out right?

(Shiray) None.

(Jelena) So you have no idea and you can’t like hold it.

(Shiray) No, and the only time I can feel something is if this lifts off of my skin. I can feel it then because I can feel it being pushed out so I know it’s something like I know I’m about to have a leak or something’s happening but most of the time I have no clue it’s coming.

(Jelena) Okay. Are there other things that you want to mention about it?

(Shiray) Yes! I was really worried. I know initially, I said I didn’t want to have a bag like when I woke up from surgery I was like “yay!” I realized that I can do so much more with a bag than I was able to do before I had the bag because I ended up, um you know before like I said I was homebound, I couldn’t leave my house, if I did leave I had to know where a bathroom was or have a change of clothes. With the bag I’ve been able to lift weights, I can swim, I can still be a normal functioning 28-year-old human, 29-year-old human.

It’s, I think it’s important that people understand that this doesn’t limit you in any way. You can limit yourself and you have to be more cautious about it. Like when I was lifting I had to work with a trainer who taught me the right form and she really made sure that my core was strong so that when I did do those heavy lifts it’s not like I was putting myself in danger. You just have to be smart about it but you can do anything with it.

(Jelena) Uh-huh. Uh, so let’s see, so how long have you had the colostomy now?

(Shiray) So I’ve had it a little over three years.

(Jelena) Okay, so you’ve had it for quite a while.

(Shiray) I have.

Shiray had so many great things to share with me that I couldn’t fit it all in this video, so stay tuned next week to hear even more from her and to see how she changes her colostomy bag.

Then last but not least is a urostomy which allows urine to exit the body through a stoma.
This one is the least common of the three ostomies that colorectal cancer patients receive and actually I didn’t know how the stoma was even formed until I did some research for this video. There are multiple techniques used to create a urostomy but I’ll just talk about the most common one which is the one that has the highest patient satisfaction rate and the lowest complication rate and that one is called the ileal conduit.urostomy bag

So for this type of urostomy they actually use the small intestine. So back to my tube here let’s say it’s all connected so what they do is they cut off that ileum part so the end of the small intestine is completely separated from the rest and they sew one end shut and the other end sticks out of your abdomen wall to create the stoma, it’s folded over, sewn to the abdomen wall just like the ileostomy. On that sewn up end, say that these are your ureters which are those tubes that will go from your kidneys down to your bladder so they disconnect them from the bladder and they insert them in at the end here. This is sewn up so the urine will pass through the small intestine and out the stoma. 

A bag is worn for this type of ostomy also, but the bag itself is a little bit different it’s got more of like a tube drain at the end rather than a larger opening like on the colostomy and ileostomy bags just because if you have an opening that’s this large dumping urine out is just gonna splash all over the place so they’ve got more of a drainage system for the urostomy bags.

So those are the three types of ostomies that a colorectal cancer patient may get after their diagnosis. I hope that cleared up a little bit what each of the different ostomies are. Let me know in the comments below something that you learned from this video about the ostomies. I learned that the stoma for urostomy is made from the small intestine. I always assumed that it was made out of some part of your original urinary system.

If you happen to have missed my diagnosis video and are unsure why I need an ileostomy, there’s the link click on that or the link will also be in the description below so that you can get caught up to speed on that. If you learned something new in this video I’d love it if you hit the like button for me, and thanks for watching I’ll see you next week.

* Click here to subscribe to my YouTube channel

* Click here to read My Diagnosis blog post