
Changing a Colostomy and an Ileostomy Bag
As a continuation of last week’s video of what the different ostomies are, this week I’m gonna share with you what it’s like to do a full appliance change on a colostomy bag. If you don’t remember that you must be new here, so welcome to Life as a Cancer Survivor. This channel is here to give you all the ups and downs, ins and outs of what life is like once you hear those words “you have cancer.” My name is Jelena, and in May of 2016 I was diagnosed with Stage 3 Rectal Cancer. For all of my newbies, make sure that you’ve hit the subscribe button either right below the video or the link is in the description right below and you’ll never miss any of my new videos.
Last week I interviewed Shiray, a Stage 4 Rectal Cancer survivor that’s also an advocate for the organization Fight Colorectal Cancer. I wanted to talk to her so that she could educate us on what a colostomy is since she currently has one. She very graciously offered to record her bag change after our interview. Then once she sent all the videos to me, she had a lot of good information in there and I didn’t want to really cut any of it out but it takes a while to do the change and to explain everything so I thought just making it it’s own video would be best so that you can see it all together and not have any of the bits cut out.
She starts off with how she lays out all the supplies before she gets started with anything. Then she takes the bag off and then of course she shows how that bag, the new bag attaches to where the stoma is. So without further ado, here’s her video.
(Shiray) So here’s what I use when I change my bag. I have these blue Equate gloves, you can get them at Walmart. I have adhesive remover wipes by Brava. I have Ivory soap to clean the area this one’s really good because it doesn’t have any moisturizers in it. I use Head & Shoulders because the zinc in it helps protect my skin so I kind of lather it up at the end and then put it on my stoma on the skin around my stoma and just let it sit for a little while. And then rinse it off and I’m ready to put the new back on. These are called barrier strips and I place these on the outside of the flange kind of like that. I use two of them so I can go all the way around.
This is a barrier ring and this goes on the inside of the flange right here to help create a better seal. This is the flange I use the Hollister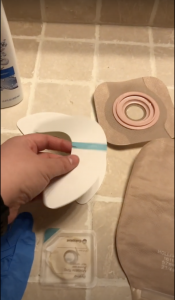 two-piece drainable system and this one has a convex on the back which pushes my stoma up. This is my pouch, it’s open right now and it just connects to the flange with the rings. And then I bought a bunch of these white cloths from Walmart that you can bleach and they come in handy. So before I get in the shower I always put my piece together so that it’s ready to go as soon as I get out so I put one of these cloths down just to keep my counter sanitary and I get these rings, or these barrier strips. I take the protective back off of it and I lay it really carefully, these are really easy to mess up, they fold up on each other and they stay folded. So I get those two ready.
Next thing I do is get my flange. There is a backing on it that peel off and I keep because this makes a really good fan for when I get out of the shower. I take off these paper strips on the side and again this is all done really carefully just so you don’t ruin the appliance. I place it down and then I want to place the sticky side up on these strips. If it folds under it’s okay as long as it doesn’t fold together and so I just repeat it on the other side making sure that the ends of this meet I use these barrier strips because I ended up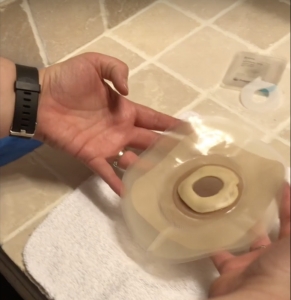 being allergic to the adhesive that’s on this brown material and so these strips help protect my skin. So I leave that there, I get my moldable ring this is the same kind of material that these strips are made out of. Take off all the extra papers and I kind of pull it out a little bit just to make the opening wide enough to fit over the flange. And I place this around the edge. And it’s moldable so you can move it around and kind of play with it to get it flat then I just lay that to the side. And it’s ready to put on as soon as I get out of the shower.
So this is what my bag looks like at the end of the week,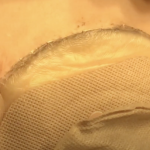 you see some discoloration here but that’s just the fuzz from your shirts, I have dog hair on mine because I have three dogs. This is where I start using the gloves I just put two on just to make sure that my hands are protected from what’s inside the bag. I also use little trash bags that come with the pouches, and I take my adhesive remover I like to use two just so I can get all the glue off. It’s just a moistened towelette and I just start working along the edges. You want to make sure not to pull it too hard because you’ll rip some skin off, some hair, anything that’s on your belly and it can cause irritation that will keep your bag from sticking the next time. I’m just running along the edge I don’t want to go too fast. And I just keep going around until it’s completely off. So I just take my bag once it’s completely off and I put it inside of the trash bag and I leave this bag so I can get all of the extra stuff from all of this change so all of these papers will go in everything will go in. So I’ll get in the shower and I’ll show you what it looks like afterwards.
Okay, I’m out of the shower and so once I got out just so no stool gets out on me after I’m cleaned I protect myself with one of these rags and I also have a small piece of toilet paper rolled up underneath that’s covering my stoma directly and this just protects the rag. I bleach these but I still like to have just a little extra layer of protection. So with the tissue, you do have to peel some pieces off you can take the edge of your rag and rub them right off. So I do have some irritation here on the bottom of my
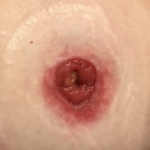
stoma so I’ll make sure to change my bag in a day or two just to make sure that that’s not getting worse usually it heals on its own without any issues but just to make sure.
So now I want to make sure that my skin is completely dry so I get that plastic piece from my flange and I just kind of fan it off. So while I’m drying, this is my incision from when I got my colostomy they had to open me up after trying to do it laparoscopically, and then you can see that I just have one hole so that’s the end colostomy. If there was a second entrance here below that would be called a loop colostomy.
So I just make sure I’m good and dry make sure I’m clean keep tissue close by so if something starts coming out you can wipe it off if it gets on your skin you have to start the whole process over again so now I take my flange that all my stuff on it and I sort of line this up in the mirror. Once I know for sure it’s good and I can set it down I just kind of work my way from the inside out.
Make sure it’s set up, I’m watching it in the mirror so I make sure that no stool is coming out but I just try to push this for a little bit just make sure it gets a really good seal. A little wrinkle here and there is not a big deal you just want to make sure that the piece that’s connected to your skin which in my case is this isn’t wrinkled or folded up on each other because that’s where you’ll have your failures. Then I take my bag, the pouch, it’s got a little grommet. And so I start at the bottom just so I can see it, and I just push it on.
And it’s still open so any air that’s coming out right now will come out of the bottom but I just go around and make sure that it’s sealed all the way around. And then I flip that up, secure it with the velcro piece, double-check it, make sure it can’t come loose, and I’ve got a new bag.
Now that you’ve watched her change her bag and understand a little bit more of what the different supplies are and the terms for them, I’m going to show you how my bag change differed a little bit from hers. So as you can see from this picture my stoma opening is not perfectly round. I would get barriers that have an opening that I would need to cut so I would use these special scissors that the ostomy companies sent. They’re not sharp at the end so I would cut this so that it would be just the right opening for my stoma. After the skin around it was perfectly clean and dry I would use a skin barrier wipe so they come in these little like packages so I would use this and I would wipe it all around where the stoma was to kind of put a barrier between my skin and the adhesive from this barrier. Then I would use a moldable ring that I would place directly on my skin and try to follow the edges of the stoma. But it was hard because of the shape of it. Then I would place the barrier on, watching closely in the mirror to make sure I placed it in the right position based on how it was cut. I really struggled with getting the bag to click after my surgery using the bags like Shiray has.
After surgery my abdomen was so sore from everything that had just happened so pushing down trying to get that bag click, it was just misery and I struggled so hard, tears were shed trying to get them into place, struggle after struggle. Then I discovered the system which I used all the way up until my reversal which was a sticker one much more comfy for me.
So the barrier itself, it just has this big landing pad and the bag itself you peel off this and the whole ring part here is sticky and you just stick it on there. I never once had a leak where the two stick together so it worked phenomenal for me. And there you go now you’ve learned a little bit more about the appliances that you use if you have an ostomy and what a bag change looks like.
If you happen to have missed last week’s video on what the three major types of ostomies are I’ve got the video right here you can click on that to watch it or the link is in the description below. Next week it’s surgery time so stay tuned for that. Thank you for watching and I’ll see you next week.
*This video was originally published on February 5, 2020